Any questions you have regarding the purchase of
my work E-mail me and I will respond as soon as
possible, usually within a few hours of your email
If you want to talk to me regarding my
work or to place an order call
Toll Free 1-877-723-3534
Checking the fit of your Saddle
A saddle is only as good as the tree under it. And without a top quality tree,
life for the horse and rider will be nothing but a series of sore backs and
aching muscles….kind of like when your boots don’t fit quite right.
Horses that have been ridden with badly fitting saddles have had muscular
damage.
You might find your saddle is leaving dry spots or your horse is becoming
irritable and unresponsive , has trouble extending, flinches when you touch
his back, moves away when you saddle him , bobs his head, or is unwilling
to make sharp turns, these responses are due to poor saddle fit. If you look
at most horses you will see that their back drops off abruptly just back of the withers. A properly made saddle will conform with this curve, but if you look
at the bars of most saddles made today you will see that they are either flat
or they have an upwards curve between the fork and the cantle, this curve is
meant as a quick easy way to accommodate the stirrup leathers, but it causes
the saddle to bridge the horses back, causing much discomfort to the horse.
An ill-fitting saddle will cause pressure points, cut off circulation,& cause
the horse major discomfort. As a horse ages his back changes , a saddle that
fit perfectly last year may cause major discomfort this year .When you start
training , a horse muscles up , this drastically changes the contour of his back
often pointing to the need of a saddle adjustment. Every time you put a saddle
on you should first check for a sore back, If you find that the saddle is causing
the sore back you should immediately have it adjusted In most cases a saddle
can be adjusted to fit the horse and relieve any discomfort for both horse & rider.
The major cause of sore backs in horses is that the saddle is bridging their backs, (not contacting the area directly behind the withers) meaning that there is a gap between the saddle and the horses back just behind the withers. Now all the weight is being carried on 4 small points one on either side of the withers and one on either side of the loins.
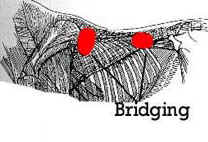
The saddle is just resting on the 2 red spots on either side of horses back.
(These points are referred to as pressure points). A pressure point is extremely uncomfortable, it is like having a lump in your shoe, I am sure you would not
walk on a lump in your shoe so why would you expect your horse to perform
with a lump under the saddle.
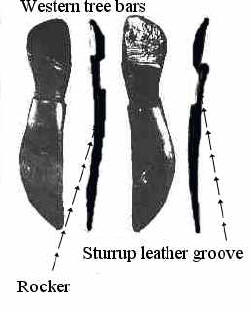
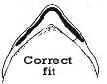
If you look at a well made saddle, you will see that there is a downward
curve built into the bars just back of the forks, this is called the rocker,
the amount of rocker in the bar must conform to the curve of your horses
back just behind the withers. The stirrup leathers on a western saddle should
be fitted into a grove in the beginning of this curve so as to form a smooth fit
along the horses back, as in the diagram below.
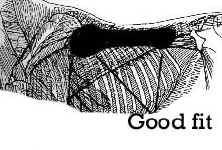
To build the right amount of rocker takes time and experience on the part
of the saddle maker. If this has been done correctly the saddle will fit as in
the diagram below. The weight should be carried evenly for the full length
of the bars .
Check the fit of your saddle against the diagrams below
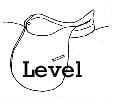
Check that the saddle is level not tipping down or up at the back.
For English Saddles
If your legs are too far back as you ride and you feel that you are
continually sliding off the back of the saddle then your saddle is
tipping down at the back. You will see that the Panels are not
contacting the horses back under the cantle when you are not
riding and you will tend to bounce as you ride. The points of the
tree will be digging into the horses shoulders, causing pressure
points.
The solution here is to have a Saddle Maker re-flock the saddle in
order to level the saddle that is tipping down at the front or back.
For Western Saddles
A saddle must be rigged so as to hold the saddle level on the horses
back, and not pull the saddle down into the horses shoulders causing
pressure points.
To see if your saddle is rigged correctly, watch the back skirt of the
saddle as you tighten up the chinch if the skirt starts to lift as the
chinch is tightened then the rigging is out of balance and should be
changed so as not to pinch the horses shoulders. The center of the
Rigging Dee on Western saddles should be about 2 inches toward
the cantle from the center of the forks and the strap that attaches to
the back of the Rigging Dee should go directly to the back of the cantle
not to the side of the flank Dee as most saddles do. It is much simpler
and less costly to put full rigging on a saddle than 3/4 rigging and that
is why full rigging is used on most saddles. It is also one of the reasons
why most saddles lift up at the back as you tighten the chinch, causing
the saddle to pinch the withers.
The solution here is to have a Saddle Maker re-rig the saddle so as not
to pull the front of the saddle into the horses shoulders, causing pressure
points.
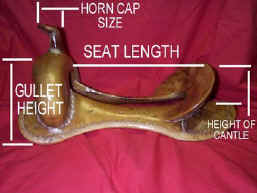
There should be 2 inches clearance from the withers to the top of the
gullet when you first saddle the horse. After you ride for 15 minutes
and the horse worms up, the saddle will settle 3/4 of an inch over the
withers You must maintain a 1 inch clearance between the gullet and
the withers .
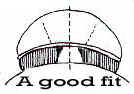
Next check that the angle of the front and how the points of the tree
sit on the horses shoulders, the angle of the front must follow the angle
of the horses shoulder and the point’s of the tree must not dig into the
horses horses shoulder’s.
The first diagram above shows the correct fit.
In the second diagram the angle is too narrow, the points dig in causing
a pressure point on the horses shoulder.
The solution here is to replace the saddle with a wider fitting saddle.
In the third diagram the angle is too wide and the pommel is digging into
the top of the horses withers.
The solution here is to have a Saddle Maker re-flock the saddle.
The first diagram above shows the panels fitting correctly at the back.
In the second diagram the one panel is sitting on the horses spine, this
needs to be corrected eminently by a Saddle Maker.
In the third diagram the panels are rounded and are uneven, this needs
the emendate attention of a Saddle Maker.
Saddle Pads
The best pad or saddle blanket available is a pure wool pad around 3/4 of
an inch thick, a saddle blanket should not exceed 3/4 of an inch in thickness,
any thicker will only tend to make your saddle role on the horses back. A
thicker blanket or pad will not compensate for a poor fitting saddle. Always
use a wool blanket it is the only material that will retain body heat when wet
from the horses sweat. Other materials will get cold and cause a chill. A
saddle blanket is meant to protect the saddle from sweat and to dissipate
heat from the horses back, it is not designed to compensate for a poor
fitting saddle.
I recommend using a pure wool saddle blanket around 32 inches wide by
60 inches long. Fold this blanket at 30 inches to make a double thickness
putting the fold at the front around 2 inches in front of the saddle.
Specialized saddle pads do not help a saddle to fit better, in fact they do
just the opposite.
In the last few years there have been so many quick-fixes advertised in
horse magazines by people trying to make a quick buck by saying use this
pad and your problems with saddle fit will go away. But just stop and think
about what the pad would have to accomplish. Saddles have been designed
to distribute weight evenly over the horses back and to give the rider security
when riding. The bars of a Western saddle flare out at the edge in order to
taper away from the horses back so there is no sharp edges to dig into the
horses back, the panels on a English saddle perform the same function. If
the edges don’t curve away from the horse then they will dig into his back.
Using pads to alter the way a saddle fits will disrupt the saddle’s balance and
weight distribution.
So many people think they can solve the problem with the type of pad they
use but in most cases this just adds to the problem . Would you put more
socks on if you had a lump in your boot of course not, so do not use a thicker blanket to compensate for a poor fitting saddle. A thicker blanket will only compound the problem, try putting a thick blanket on your horse then try
putting your hand up under the saddle just behind the withers you will find
that the saddle is now bridging your horses back between the forks and the
cantle. A saddle blanket should not exceed 3/4 of an inch in thickness, any
thicker will only tend to make your saddle role on the horses back and cause
the saddle to bridge. A thicker blanket or pad will not compensate for a poor
fitting saddle. Always use a wool blanket it is the only material that will retain
body heat when wet from the horses sweat. Other materials will get cold and
cause a chill.
If your saddle is to narrow.
If your saddle is to narrow then the points of the tree will dig into the horses shoulder, the saddle will ride too high on the horse’s back and the bars or
panels will press into the tissue at the edge of the spine.
Putting a heavier pad on will make a narrow saddle even more narrow and
will cause the saddle to bridge the center of the back. The heavier pad will
not change where the weight rests, it will only cause the points to dig into the
horses shoulder more.
The solution here is to have a Saddle Maker widen the space between the
Skirts or Panels so they rest around 2 inches down from the horse’s spine,
to form the Panels to conform with the horses back and to widen the tree
points.
Riser pads
The use of Wither pads to raise the front of your saddle over the withers will
cause your saddle to “bridge” the horses back, (saddle is not contacting the
center of the horses back) your saddle will tip so the flare at the back of the
saddle will dig into your horses loin’s and the points will bare most of the
weight.
The solution here is to have a Saddle Maker raise the front and center barring
service of your saddle, shape the Skirt’s or Panels to conform with your horses
back and at the same time keep the saddle level with the horse’s back.
Banjo pads
The use of Banjo pads to raise the back of your saddle over the loin’s will
cause your saddle to “bridge” the horses back, (saddle is not contacting the
center of the horses back) your saddle will tip so the points will bare 2/3rds of
the weight, and the flare at the back of the saddle will bare 1/3rd of the weight.
The solution here is to have a Saddle Maker raise the back and center barring
service of your saddle, shape the Skirt’s or Panels to conform with your horses
back and at the same time keep the saddle level with the horse’s back.
Foam or Neoprene Pads
Any pad using Foam or Neoprene acts as an insulator, instead of absorbing the sweat and dissipating heat, the foam holds the sweat and heat against the horses back. Most of the pads available use Foam or Neoprene in there manufacture.
A Heavy Pad
A extra thick saddle pad is only beneficial in the case of a saddle that is too wide
for the horse it is being used on. A horse that has lost a lot of weight or muscle
tone can be helped by using a heavy pad until the muscle tone has returned. This will only work if there is no bridging, the bars or panels are the right angle and
the saddle sits well of the spine with the heavy pad
If a Saddle is not fitting
If you find that your saddle does not fit your horse, your best option is to have a qualified Saddle Maker do a saddle fitting and then go over the options with you.
Do not use a specialized pad, it is only a band aid fix and will cause you and the horse grief and expense. In the end your only option is to have a saddle that fits.
Weight a horse can carry
& it’s Distribution
A horse over 5 years old and in good physical shape can carry up to 35% of it’s weight with a well fitting saddle after it has been trained to handle a rider on it’s back. This equates to around 300 pounds for a 1000 pound horse. Carrying more will cause damage to his back, legs, tendons and hooves.
But this weight must be well distributed over a large area of his back so as not to create too much pressure over a small aria of his back and the saddle must fit.
The Panels or Skirts of your saddle are designed to distribute this weight over a number of square inches.
To calculate the square inches in the Panels or Skirts of your saddle simply measure the width and length of the Skirts or Panels and multiply width by length.
To determine the weight bearing aria of your saddle divide the weight you want to carry by the number of squire inches in the panel or skirt of your saddle.
Example a English Saddle weighing around 35 pounds has 2 skirts that measure around 16 inches long by 4 inches wide – 64 square inches per side for a total of 128 square inches.
A 145 pound rider with 30 pounds of tack ie. 175 pounds total on the English Saddle in the example above adds up to 1.36 pounds per square inch.
Example a Western Saddle weighing around 20 pounds has 2 panels that measure around 24 inches long by 10 inches wide – 240 square inches per side for a total of 480 square inches.
A 145 pound rider with 60 pounds of tack ie. 205 pounds total on the Western Saddle in the example above adds up to .42 pounds per square inch.
Example a Pack Saddle weighing around 40 pounds has 2 panels that measure around 22 inches long by 5 inches wide – 110 square inches per side for a total of 220 square inches.
A 250 pound load with 50 pounds of tack ie. 300 pounds total on the Pack Saddle in the example above adds up to 1.36 pounds per square inch.
Example a Treeless Saddle weighing around 20 pounds has a weight bearing area of a bought 12 inches by 6 inches for a total of 72 square inches.
A 145 pound rider with 20 pounds of tack ie. 165 pounds total on the Treeless Saddle in the example above adds up to 2.29 pounds per square inch. Much exceeding the maximum recommended weight per square inch.
Maximum recommended weight per square inch should not exceed 1.8 pounds per square inch.
With the horse standing on level ground
start the fitting.
Start the saddle fitting by putting the blanket you will use with the saddle
you are fitting on the horse . With the blanket in place , put the saddle on.
With the blanket in place run your hand up under the saddle just back of
the withers you should feel even contact for the full length of the bars.
If you feel a gap between the saddle and the horses back just back of the
withers running toward the cantle than your saddle is bridging.
If the saddle is tipping up at the back.
If the saddle is tipping up at the front.
If the pommel is close to the withers.
If the pommel is too high 2.5 inches or more above the withers.
If you feel lumps along the panels.
If the panels are uneven side to side.
If the tree points are digging into the horses shoulder.
If you find any of the above problems you
can bring or send your saddle to me and I
will make the needed adjustments.
Do not do a saddle fitting without the pad you are going to ride with under
the saddle. There is a misconception among people that should know better,
that the saddle should be fitted to the horses back without the pad, (a dry fit)
if you re-stuff to conform to the horses back without the pad you can be sure
the saddle will bridge after the pad is placed on the horse.
One of the best methods to ascertain the fit of a saddle
is to make a mold of your horses back & bring the
mold to me along with your saddle, I will
then advise you on how to best proceed
Below you will find a Web Site
that can supply the needed
supplies
A saddle has to be fitted to a particular type of horses back.
A saddle that is made to fit a wide back will not fit a horse with
a narrow back
A saddle that is made to fit a horse with a flat back will not fit a
horse with a hollow back and so on.
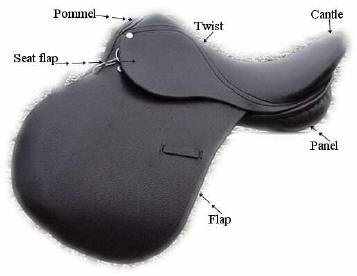
Some English Saddle Terminology